IMPORTANT: I hope for this post to be edited overtime and for it to make its way as an article to be published over at the GRIDNET Magazine here). Still, the software is already out there available, so I’ll keep editing it right over here in hopes some of us could benefit, already.
Prelude
Okay, so you’ve already decided on or are still considering becoming ⋮⋮⋮ Operator. Good for you! Good for the ⋮⋮⋮Community (…) and good for the entire human race ( as ⋮⋮⋮ GRIDNET OS certainly is a pro-freedom project). As an Operator, you are responsible; for maintaining the network operational and in good standing. You might not have control over the network, which certainly is desired, but you together with other Operators help to make the world a better place. You decide on what basis and to what extent you wish to participate within the eco-system.
From the technical perspective, the choice mainly boils down to deciding which ⋮⋮⋮ Sub-Systems you wish to have enabled (i.e. decentralized storage, web anonymization services etc.). You might wish to help process transactions broadcasted throughout the network, you might choose to host assets of graphical decentralized applications, your CPU might be running Decentralized Processing Threads required by these… but multitude of other activities and opportunities supported internally by GRIDNET OS await! Such as? You might help others around the world in getting anonymous, un-obstructed by (ex. government) firewalls access to the Internet! As GRIDNET Core embodiments decentralized web-proxy service. Then you might choose to host either encrypted and plain-text data files of others.
As an ⋮⋮⋮ Operator - you get to choose. As you do ⋮⋮⋮ OS provides Unix/Linux -compatible management Utilities.
Whatever path you choose, for everything you shall be rewarded (storage, data-exchange - on per-byte basis, processing fees, etc.). The network ensures rewards for some of the most miniscule tasks, such as block-exchange and transactions’ retransmissions to other nodes. That is thus in your sole incentive to configure routing of ports on your NAT/ router properly, as otherwise, others wouldn’t be able to connect with you, meaning less income.
Now, the aim of this brief post is for you to get a better understanding of what is going on under the hood and to equip you with utilities that could be used to assess your node’s state and to introduce changes, if and as needed.
If you are feeling technical, do know that GRIDNET OS is an extremely active research project. I strongly encourage you to read this Research in particular to get a better overall understanding of the technology, you as a highly respected Operator, now aid increasing the proliferation of.
[First Moments]
The installation is complete and you launch the software.
In [1], there’s the location of the log-file. All the events appearing in the Events’ View also make their way into this very file.
Little below, there’s a path where all the data files are to be stored at.
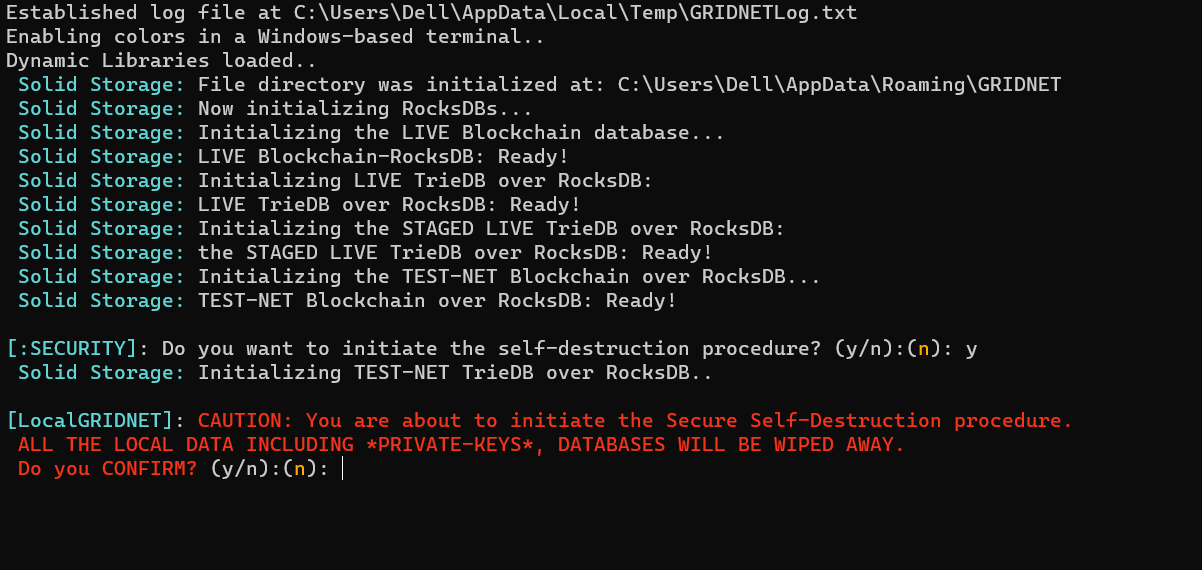
In [2] should a need arise, you may choose to wipe out all the data files (including your Operator’s private key). Note: the Operator’s private key is generated autonomously during the bootstrap process. You may then choose to export your private key to the mobile app, through a QR code which would be rendered within the Terminal. More on that later.
If you ever decide to do so, you would be shown with a screen reassembling the one below:
GRIDNET Core was designed to configure itself autonomously without your aid. That is, if you do not decide to disrupt and override the automatic configuration process.
Thus, right after the initial auto-destruction inquiry, you are asked whether to proceed with autonomous configuration:
![]()
If you do not confirm within a few seconds, the system would proceed automatically.
Now, during consecutive launches of the software, at this stage, you would see a screen looking like the one below:
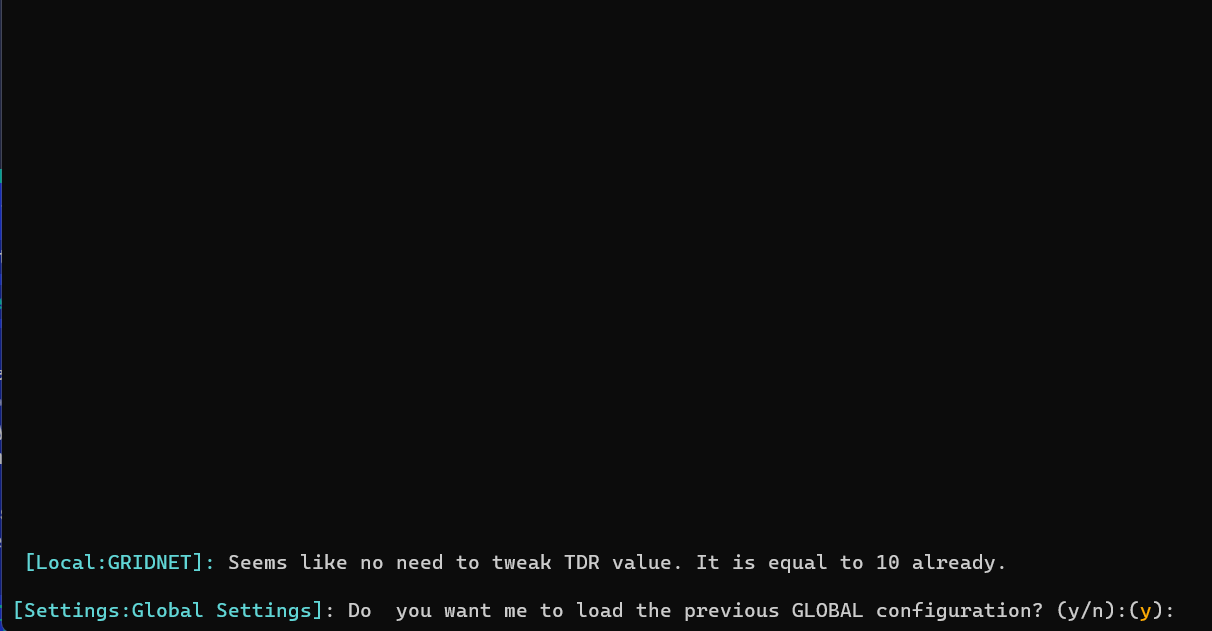
Reportedly, the TDR value must had been already previously tweaked, and the system is about to proceed with previous configuration.
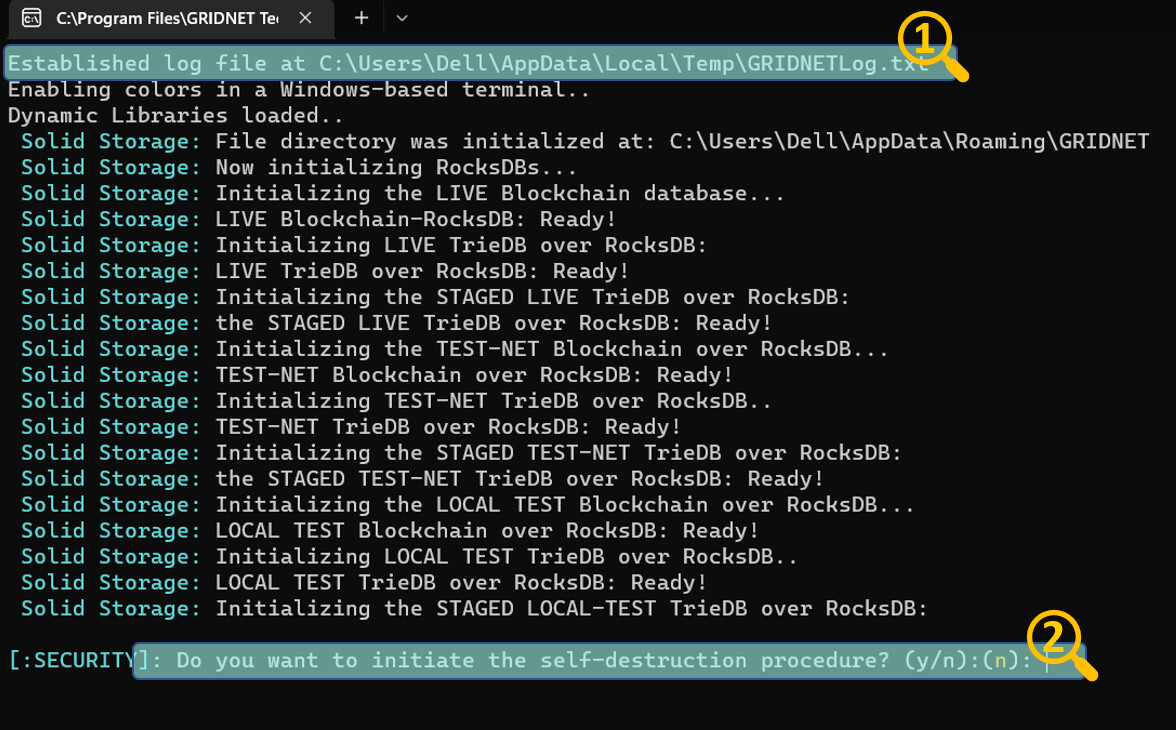
Now, the system attempts to deploy the internal data-store for all modes of the network (Test-Net, LIVE-Net etc.) No need to worry about any of that.
In a few seconds, one would see the above question. If you do not object (by pressing ‘N’) the system would continue loading the previously established configuration.
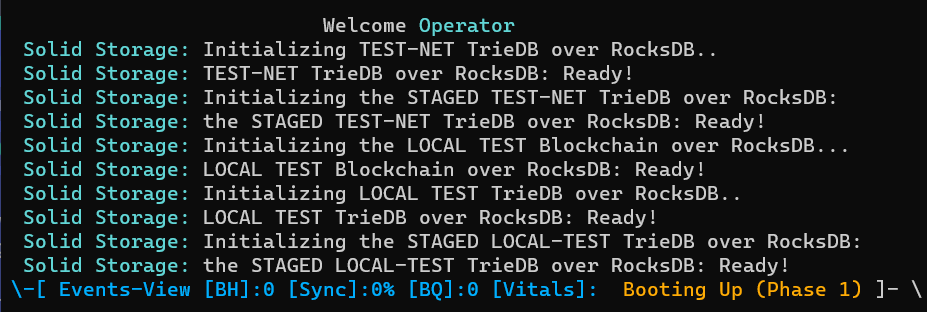
During the autonomous configuration process, you would be seeing lots of events rushing through:
Yet again, nothing to worry about, unless something unexpected happens and/or the system needs your assistance in wich case you would be asked to assist and/or to decide upon some things.
Soon enough Windows Firewall would display a pop-up asking whether you agree for GRIDNET Core to be utilizing your network connectivity.
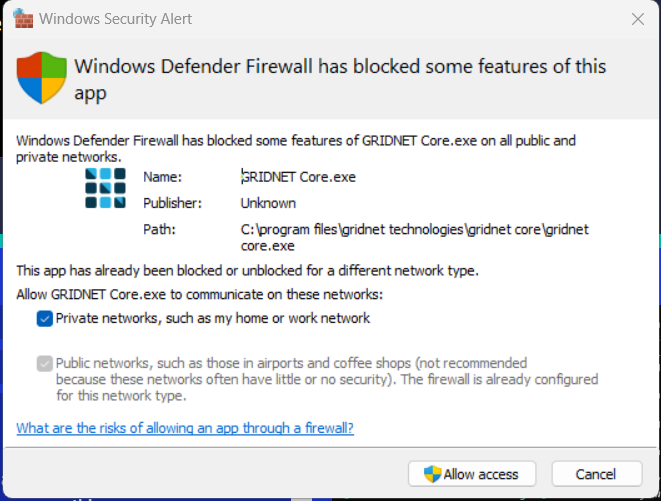
Since Internet connectivity is required, simply tap on Allow access.
By default, when autonomous self-configuration enabled, during the bootstrap sequence the system attempts to initialize all of the following sub-systems:
Notice: recently lots of effort has been put to enable for all of the below sub-systems to be multi-plexed over just a single port (443 TCP/UDP) - so to improve resilience against misconfigured firewalls and/or NATs. You may read more about it in Release Notes of version 1.0.3 here
-
Blockchain Manager- the main subsystem for each of the sub-nets (Test-Net, Live-Net etc.)
-
Transaction Manager - responsible for processing of any processable objects. That includes Data Blocks, Transactions etc. Works closely with its corresponding Blockchain Manager.
-
Network Manager - the main networking sub-system, other networking sub-systems derive from and are controlled by. These other networking sub0systems include:
-
Internal Web-Server - provides access to the Decentralized User Interface to clients over web-browsers. It also serves files from the Decentralized Storage, should one decide to access these directly (ex. for NFTs). This service employs ports 80 and 443 for encrypted TLS 1.3 based communication.
-
Decentralized State Machine (DSM) Synchronization service - takes care of facilitating data exchange required by the decentralized consensus (scheduling of block downloads, broadcasting of transactions etc.) That sub-system is in close cooperation with the corresponding Blockchain Manager.
-
Decentralized Storage - just as the its name suggests. That includes full-redundancy ‘on-the-chain’ storage and off-the-chain storage through a crypto-incentivized variance of Torrent protocol. At the bottom of everything the system employs RocksDB as a data-storage engine.
-
UDT communication Core Service - data-center class data-exchange protocol, way more efficient than TCP.
-
Web-Socket Communication Sub-system - employed mainly by the decentralized user interface.
-
WebRTC Communication Core Service - used by UI dApps employing decentralized cross-browser communication. Thanks to your node providing this service, these UI dApps do not need centralized servers, even for what is called WebRTC signaling.
-
SSH-based Terminal Core Services - for spawning command-line based user interface to clients connecting over SSH. Employs TCP port 22.
-
Decentralized Web Anonymization Service - from the Operator’s perspective, you earn Coins by helping others browse the Internet anonymously. Others may choose to access your services directly (ex. by visiting https://[YOUR_PUBLIC_IP]:444/https://wikipedia.org). As your node bootstraps feel free to take these services offered to others for a spin yourself simply by visiting https://localhost:444/https://wikipedia.org. Surprise you are now Wikipedia!.. Go ahead try with Google as well https://localhost:444/https://google.com… Wooohooo… your node now is Google. This decentralized service is also available to creators of UI dApps. The most notable UI dApp which already employs this service is the Browser UI dApp. It not only provides additional layers of anonymity but allows for persistent customization of the looks of external websites. Remember that there are countries in the world that prevent citizens from accessing services such as Wikipedia and/or Google.
-
Peers’ Discovery Core Service - allows your node to discover others in a fully decentralized fashion. There are a couple of bootstrap IPs encoded into the software; you may provide additional IPs during the Bootstrap sequence. Under the hood, the system employs a variance of Kademlia protocol.
-
Work Manager - quite a sophisticated computational engine. For now, it is mostly used as an abstraction layer over the underlying OpenCL sub-system, for computing ‘Proof-of-Work’. Yet still, the system is much more capable. Once it bootstraps it attempts to detect all your CPUs and GPUs. By default it would prefer dedicated GPUs over integrated GPUs and/or CPUs. You may change these settings by overriding the default bootstrap sequence. One of the more interesting aspects is its ability to deploy virtual GPUs, beta-support of verifiable computations, computational tasks that can be advertised throughout the network and other things. Should this sub-system fail to initialize mining services would not be Operational. Ensure to keep your GPU drivers updated at all times.
*** Internal Firewall - ** autonomous firewall service. Should anyone attempt to abuse any of the above mentioned services in any way. He or she would be banned. It’s as simple as that. No action on your part is ever required. Pretty cool, huh?
Now, getting little bit ahead of us - after all the initial bootstrap sequences are completed, your node would enter a Grace Period. The period may last anywhere between 5-20 minutes based on the detected performance of your hardware and/or network connectivity. That’s the time your node is given to sort out any pending matters such as performing network synchronization, updating files behind the decentralized user interface etc. After that period is over, the Work Manager would be armed by Blockchain Manager and become ready for Proof-of-Work operations. But for one thing. In order to be energy efficient, the system would not proceed with these operations unless it finds to have rational chances of winning the proof of work race. That usually means your node synchronization state being > 97% and not too far off the Horizon of Events. Now, that sounds sort of Epic does it not.
Only once the Work Manager is armed, and only once Blockchain Manager deems to have non-negligible chance of winning the proof-of-work race, would it decide to compile the OpenCL Kernel, the fans would begin spinning (…) they would (…) and the money would begin flowing in (…).
OpenCL Kernel is a low-level program written in pure C, that carries our the proof-of-work algorithm. We have introduced some optimizations to the process. Why? Compilation of the Kernel is device-specific. If you’ve got multiple GPUs, each such GPU needs to have the OpenCL compiled for it specifically. Now, the bummer is the process may take hours. So, we’ve introduced some optimizations to mitigate and offset for such a technical drawback. So, once the kernel is compiled for each computational device, the resulting binary code is cached both in RAM and the binary code is stored onto the hard-drive. So in short, if you see the kernel taking long to compile… let it run. Next time you launch the software the pre-compiled binary would be fetched from hard-drive in less than a second and each of your GPUs would initialize almost instantly.
Now, let us go back to the Events’ View.
Note: you may switch between the Event’s View and Operators Command Central at any time by using key combinations of [CTRL+W] and [CTRL+E] respectively. The Global Chat view is not available from Core directly, one would need to SSH over to local node and press [CTRL+Q] over SSH to be able to chat with the others.
As the sub-systems are initialized, you would be informed on the progress of each initialization of each of these, ex. :

Before the system agrees to fully initialize and become Operational, it needs to perform integrity validations of all of the data stored locally. Above everything this includes validation of the local Verified Chain Proof. The concept of a chain-proof is sort of complicated and would be described in detail another time. For now, let it suffice to say that it is a sequence of block-headers comprising the verified history of events (built of data-blocks). As soon as nodes connect with each other, they let the other peer know about the latest block they are aware of. The other peer looks at the provided block-header and if it finds the block to be of interest, it queries the sender for a chain-proof, at the same time providing few reference points, from the history of events, the chain-proof could begin at. Such points typically correspond to blocks in the past the node already became aware of and verified. It provides such reference points during chain-proof inquiries so to minimize network overheads. Otherwise nodes would either be exchanging entire chain-proofs – starting at the very first genesis block, up to the most recent block-header.
Operator, the gist is, that before your node attempts to download any data, it needs to be ensured that the data truly does become part of the global history of events. Chain proofs allow for the very that, before the data is even downloaded. How is it even possible? Remember, a chain-proof is comprised of a sequence of block headers. Headers of both data-blocks and key-blocks. Even though block-headers do not contain any actual payload (transactions, files, NFTs etc.) they contain representations of Proof-of-Work – in the case of Key-Blocks and a signature of the issuer– in the case of data-blocks. Of equal importance – both types of blocks encapsulate a reference to a previous block. Thus, even without seeing the actual payload and just by looking at the chain-proof, the node can decide whether the given history of events is secured by proof-of-work, and whether to schedule the actual blocks, with payload (transactions, NFTs etc.) for download. It can calculate the total cumulative proof-of-work of the entire history of events, represented by the given chain-proof. An interesting point is, that as partial chain-proof are delivered, they can still be used by the receiving node to reconstruct a full-chain proof, if it starts with one of the check-points provided by the other peer during the inquiry. Operator, keep in mind that chain-proofs are exchanged reactively. These are requested only in the event of having previously received a block-header which was found to be of interest. Nodes distribute block headers describing most recent blocks (block-leaders), to all connected peers, as soon as these change.
Operator. The software keeps track of two chain-proofs. The Heaviest Chain Proof and the Verified Chain Proof. The earlier represents the heaviest, in terms of both the cumulative Proof-of-Work and length (to account for both the data-blocks and key-blocks) history of events. It is modified only based on the received chain-proofs. It can be said that the heaviest chain-proof serves mostly the purpose of scheduling blocks for download.
The latter, it represents the history of events **that was verified by the software, locally. ** It is the most crucial and protected data-structure. It can be modified only during a Flow on a per-block basis (full processing a of block including its payload i.e. transactions). When nodes are queried for chain-proofs they respond only based on this verified chain-proof, not the heaviest chain-proof.
Notice that as blocks from the Heaviest chain-proof are downloaded and verified, the heaviest chain-proof steadily becomes the verified chain-proof, as long as blocks pass full verification.
That double buffering mechanism is of a paramount importance. It ensures that invalid blocks not having a chance of extending the history of events are not downloaded, protecting your software against a broad family of attacks. Just imagine an evil node trying to waste your node’s computational power by providing it with data blocks containing invalid processable objects. Such data-blocks, containing invalid transactions would need to be both downloaded and then processed by your node’s CPU. Second, the headers of blocks comprising the Heaviest Chain-Proof are used as a data-source for the Network Manager which schedules consecutive data-blocks for download. Network Manager does so by generating appropriate Network Tasks which are distributed among peers - your node managed to establish DSM-synchronization enabled connections with (ex. connections with mobile devices, web browsers etc. would not count as such). Download tasks are distributed in accordance to a random distribution.
Enough theory. Let us go back to the interface of GRIDNET Core:
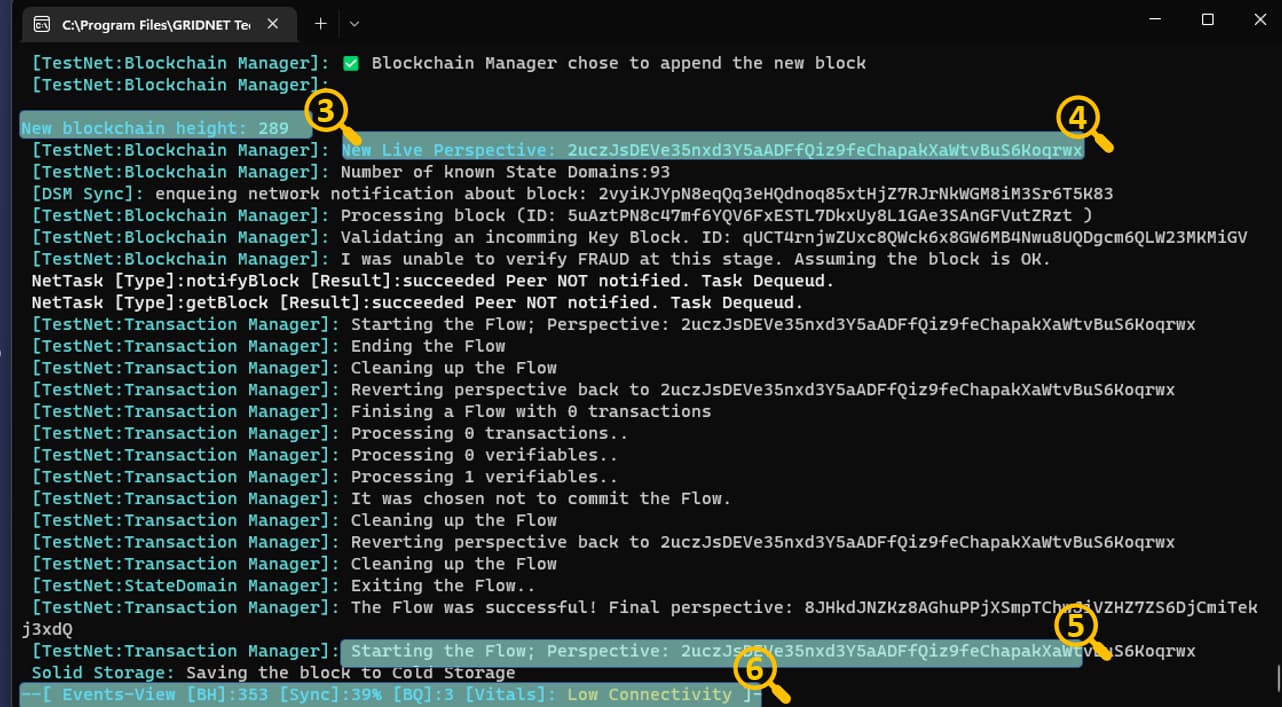
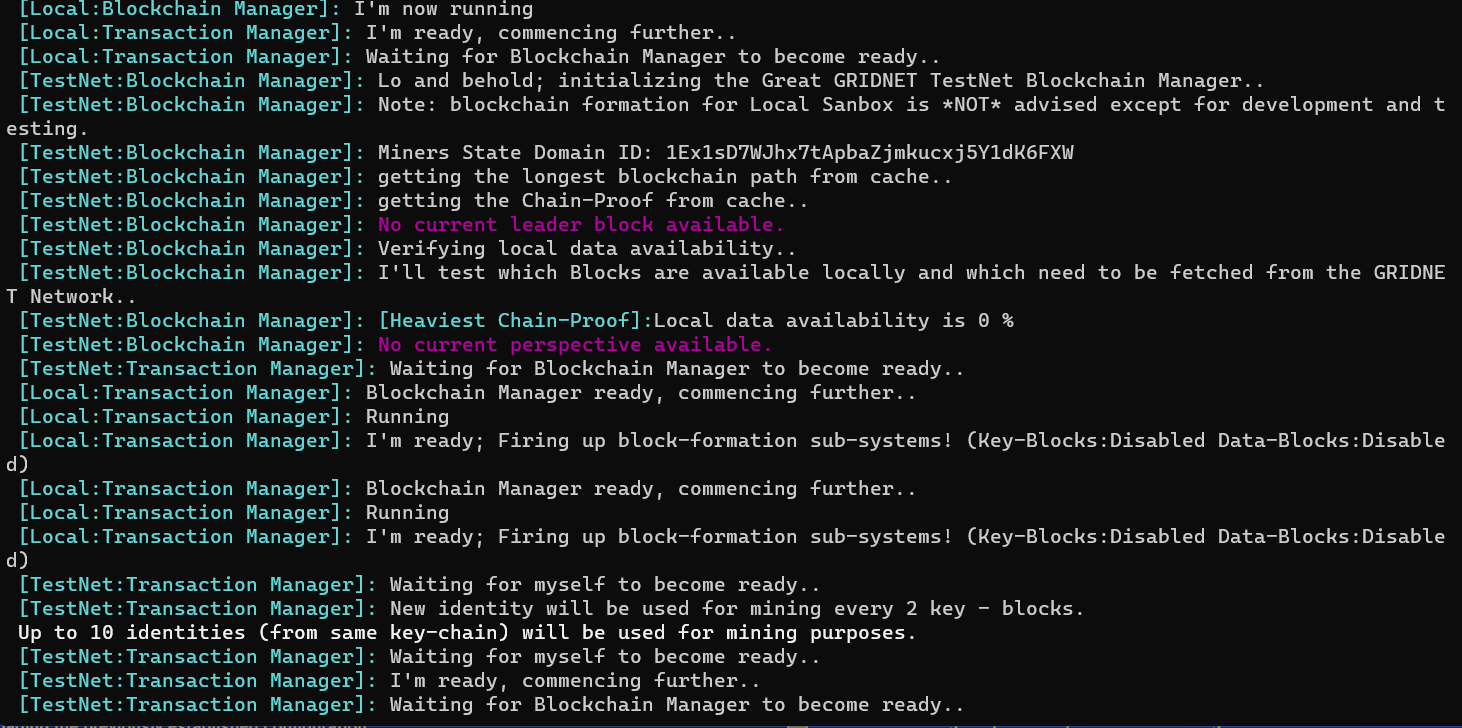
Lots of events flowing by.
[3] - a data-block received by the node managed to make its way into the Verified History of Events. It extended the blockchain.
[4] - each state of the Decentralized State-Machine has its identifier. We call it a Perspective. You may switch to any locally available perspective command by using the ‘perspective’ command from the Operators console and providing the identifier as an argument. Recall that one may use ‘sync’ to synchronize one’s Terminal with the current state of the DSM. In SSH sessions it is not needed but when accessing Terminal services directly from the Operator’s Pane, one needs to execute ‘sct test net’ first. SCT stands for Set Commit Target.
[5] - our concept of processing of received data shares some similarities with what is known from the realm of Database Systems. Instead with ‘transactions’ though, we deal with ‘flows’. The concepts are similar though. Each data-block is processed within of a ‘flow’. Processing of a flow, if successful, results in a new Perspective. Each data-block encapsulates its identifier.
[6] - Status Pane - refreshed in real-time. While the log may be little bit behind, this line is always 99.9% accurate. It comes with a couple of indicators. Some of which are there all the time, others seldomly appear ex. during an update. The static ones include:
[BH] - current height of the blockchain.
[Sync] - current synchronization state
[BQ] - blocks pending processing by the Blockchain Manager
[Vitals] - an attempt of the software to notify you, the Operator, and others that connect with your node about its current status. Notice that the very same Events View is available to anyone who connects through SSH.
Now, how about getting a glimpse of Operator functionalities?
Press [CTRL+E] to enter the Operator’s Command View.
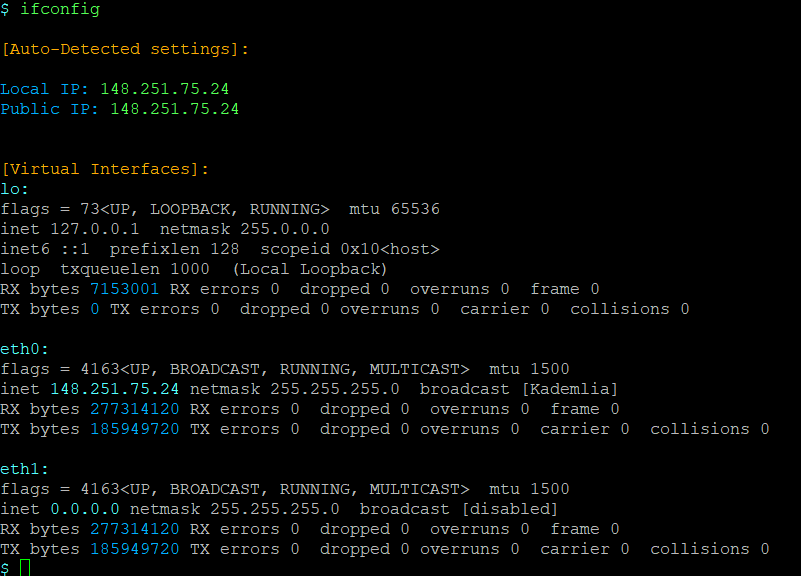
Type ‘ifconfig’ to see the Virtual Network interfaces that were auto-configured during the initial bootstrap process. You would be presented with a view similar to the one below:
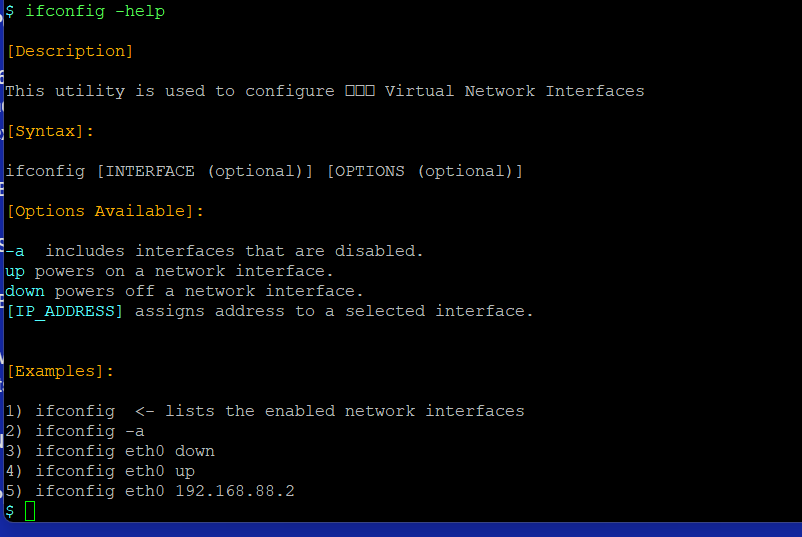
Should you wish to introduce any changes, you may get to know your options by appending ‘–help’ to the previous command as its invoked, just like shown below:
One of the things worthy to notice is the amount of bytes exchanged on both of the two auto-configured interfaces.
Eth0 represents the publicly available interface. The IP address assigned is used for instance within QR Intents generated by your node, as well as within the WebRTC protocol and throughout the Decentralized Web Anonymization services. Should you have multiple public IPs available you may to reassign as needed.
Eth0 represents the interface the node listens on for incoming connections. 0.0.0.0 represents any IPv4 address available. Should you wish to limit IPv4 addresses your node listens on, you may want to reassign it to a more specific value.
Operator, we’ve already mentioned the Internal Autonomous Firewall Service. How about taking a look at some of its current state? For this you may use the ‘firewall’ utility. The utility displays its internal man-page as soon as it is invoked:
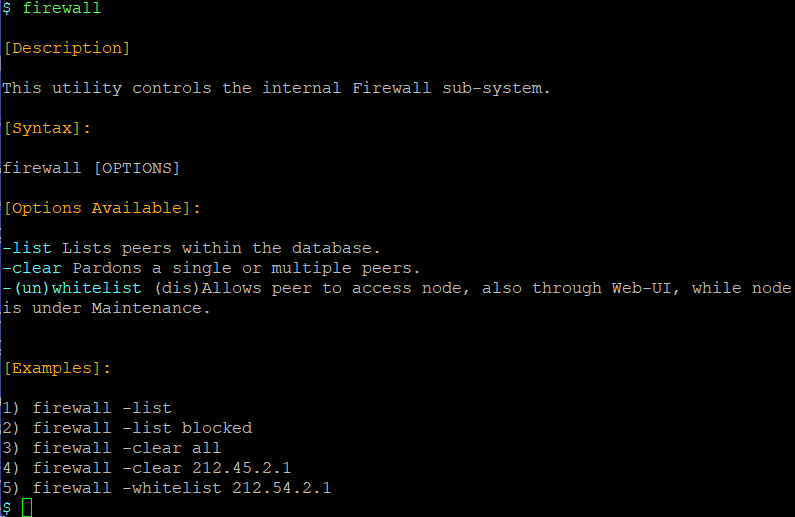
Operator, should you decide any user to be auto-banned by mistake you can pardon the peer by using the ‘whitelist’ option. Should you detect any suspicious behavior by manually analyzing event logs? Ban the other peer at once.
At the beginning we’ve mentioned that during the initial bootstrap sequence, GRIDNET Core generates your Operator’s wallet all by itself. In fact, it generates a multi-dimensional wallet. What does it mean? The topic is rather complicated all in itself (…) let it suffice to say that as your node operates, it may dynamically generate new identities (by default up to 10) and use these for identification purposes. Joggling identities may be beneficial for increased anonymity. And yet still, all it takes is your main private key to recover assets from all of the offspring identities.
How about getting to know your Operator’s Master Private key? Have your mobile device with the GRIDNET Token mobile app ready at hand. The private key, alongside your entire Operator’s Key-Chain would make its way onto your mobile device so to rest there securely.
Switch to the Operator’s Command Pane, make sure you are not in the scope of any State Domain. Then:
-
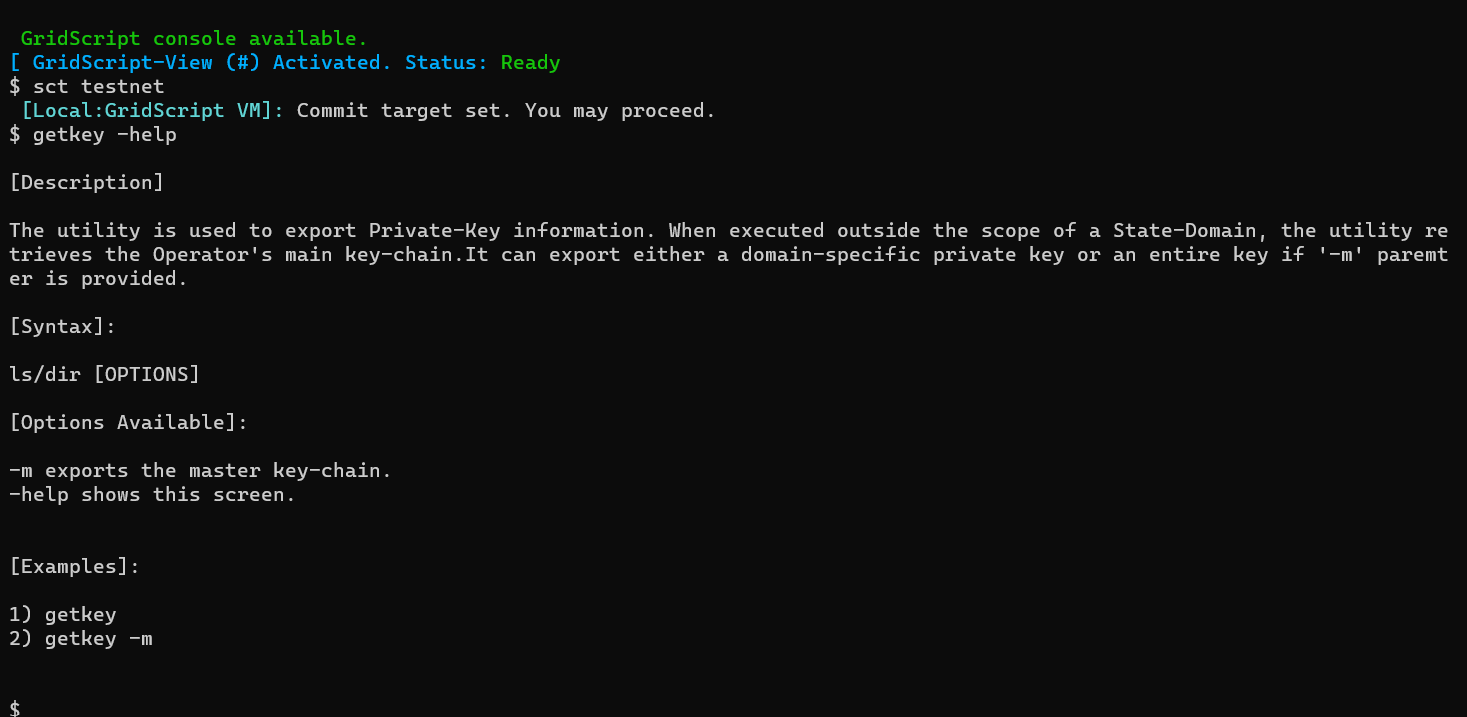
First, execute the ‘sct testnet’ command to make sure you are operating on the realm of the Test-Net.
-
Second, execute the ‘getkey – help’ command to familiarize yourself with the ‘getkey’ utility.
-
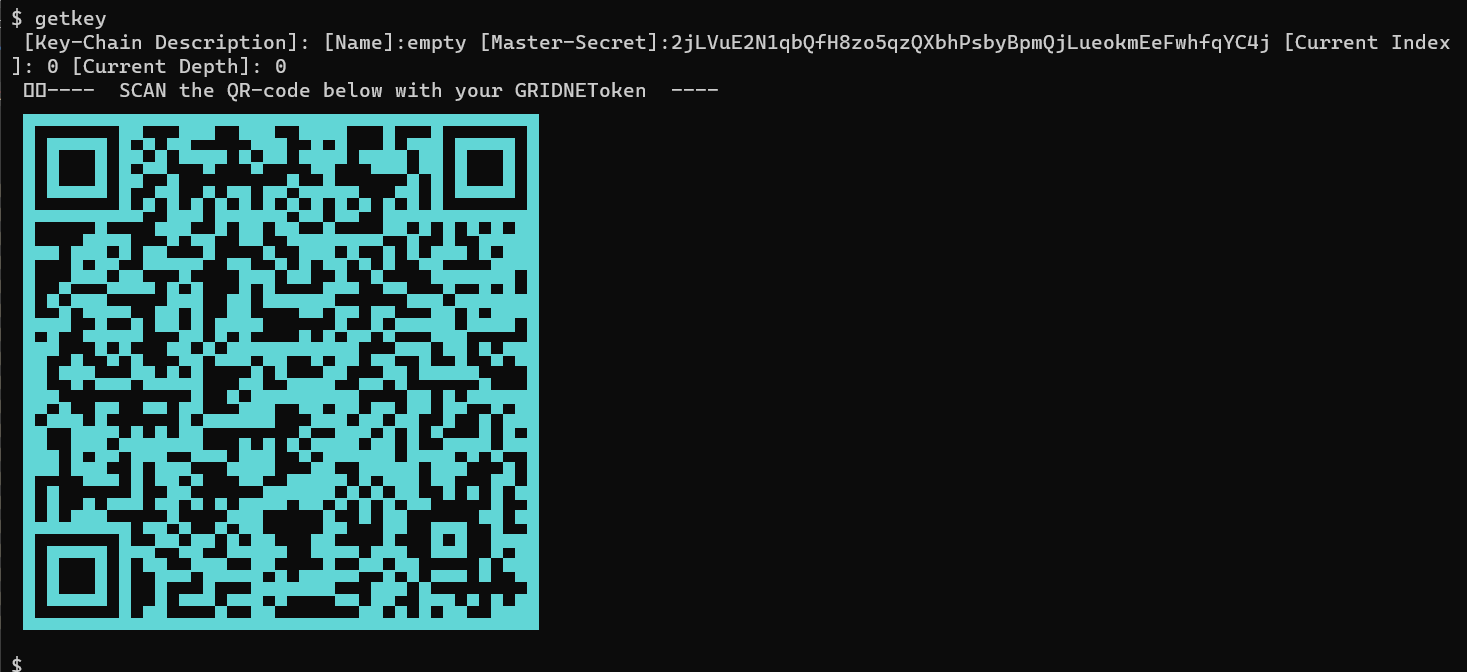
Once ready, and after having ensured that nobody is looking over at your screen, type ‘getkey’ alone. . In a moment a QR code would be shown:
-
Scan the QR Intent with the GRIDNET Token mobile app.