Hello @jamie , it is wonderful to be hearing back from you!
Let me relate to the logs you’ve provided.
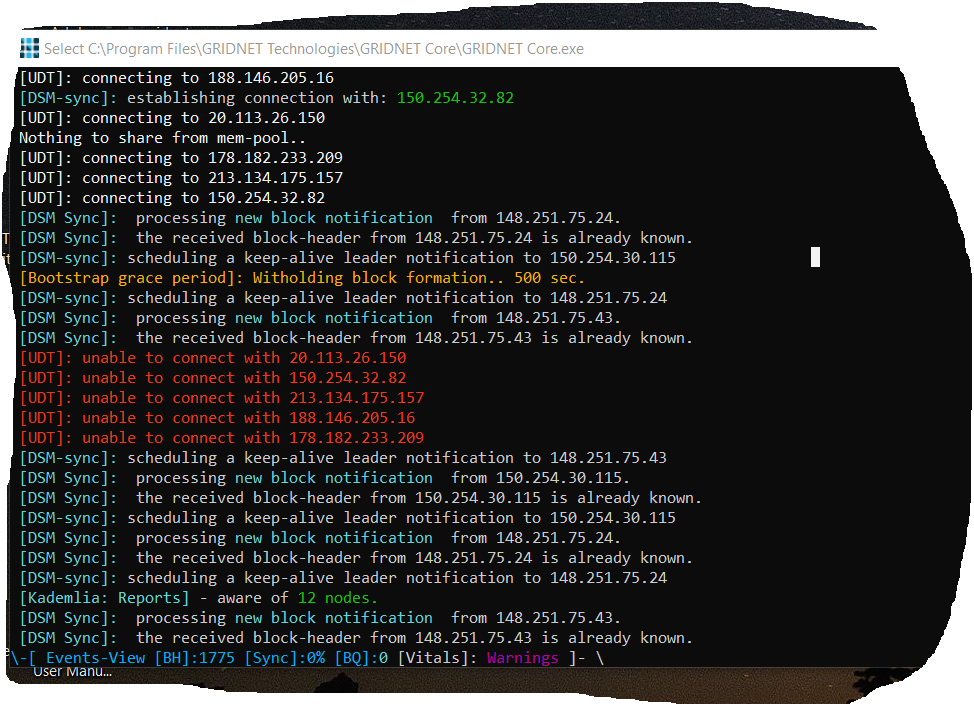
First log ends with:
 Killing your session due to inactivity…
$ Connection to test.gridnet.org closed by remote host.
Connection to test.gridnet.org closed.
If you stop typing for a certain amount of time, the ⋮⋮⋮ Node you are connected with, it would terminate the connection to save on resources. That is normal.
Second log is way more interesting - let us take a look, shall we…
Notice @jamie that we have made the ‘Preformatted text’  formatting tool-button, - the one available here at Talk GRIDNET, compatible with the output coming from GRIDNET Core.
So next time, you may copy-paste from GRIDNET Core directly over here and it would render the very same way as seen on your own computer.
~~ Welcome Anon2721😻! Wizards🧙 wishing you a nice stay 🙏 ~~
Fetching recent Wall messages..
Your session is currently the only active one. Feel at home☕.
I'm initializing your remote session, please hold on..
Initializng #GridScript VM
[Transaction Manager]: Waiting for myself to become ready..
GridScript 1.0.0
Type "about"for more information. Type "bye"to exit.
Entering SandBox mode.
You've got 10000000 ERG💰 available.
[Transaction Manager]: I'm ready, commencing further..
[Transaction Manager]: Running
Your Decentralized Terminal(DTI) is now ready. You may proceed.
Views: [CTRL+Q] - chat, [CTRL+W]) - events [CTRL+E] - Shell
Type 'logmein' to authenticate with your 📱
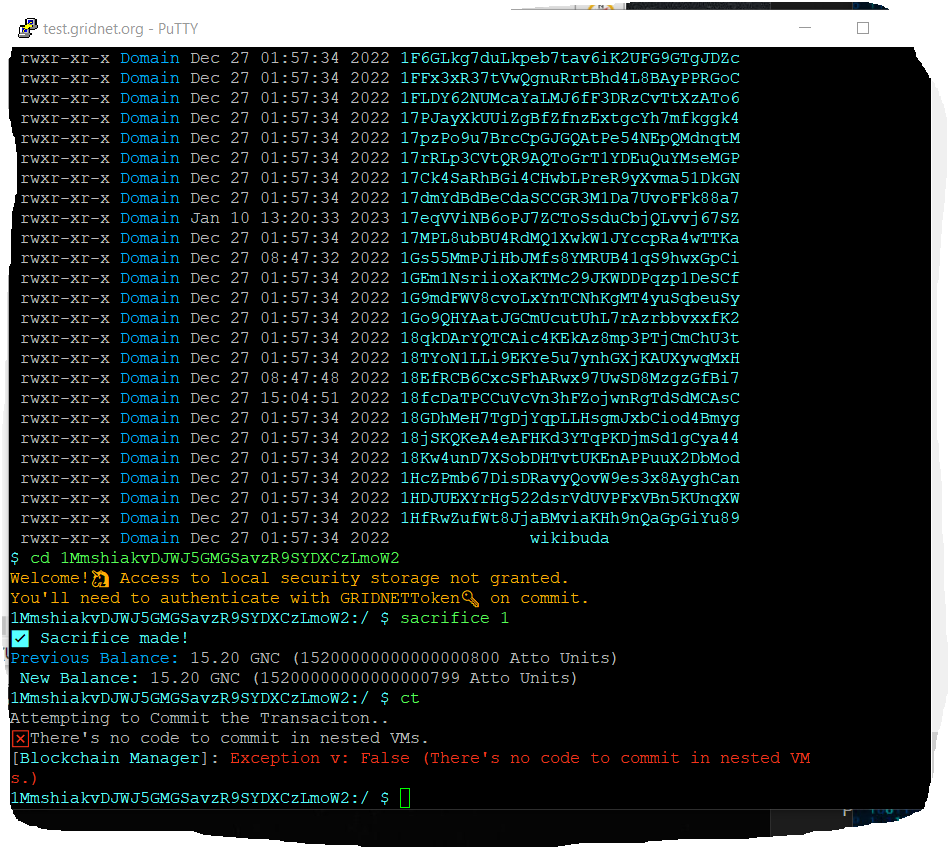
$ cd 1MmshiakvDJWJ5GMGSavzR9SYDXCzLmoW2
Welcome!🦄 Access to local security storage not granted.
You'll need to authenticate with GRIDNETToken🔑 on commit.
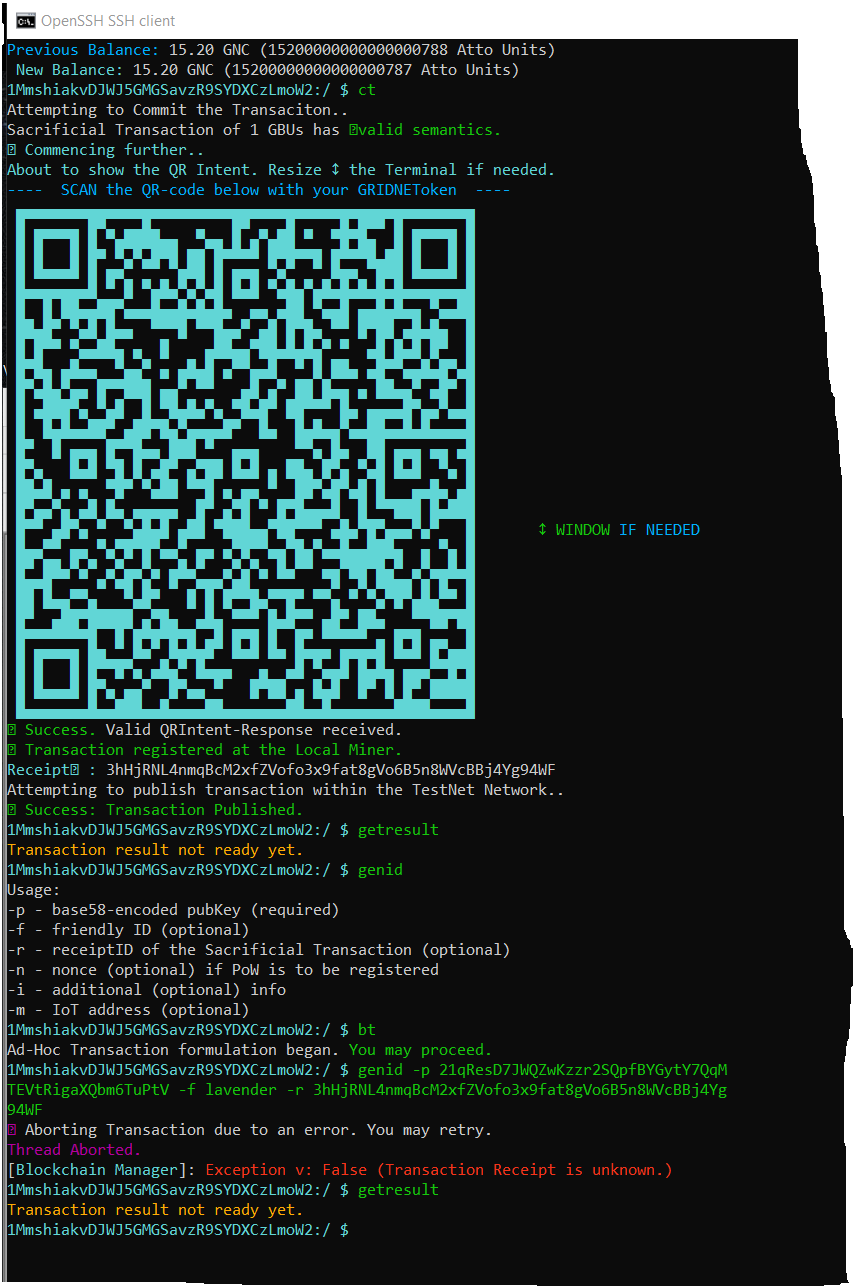
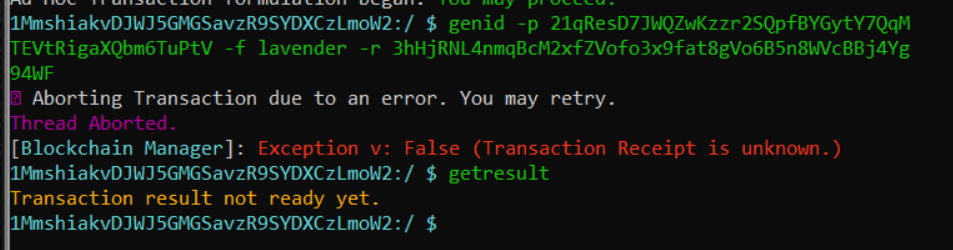
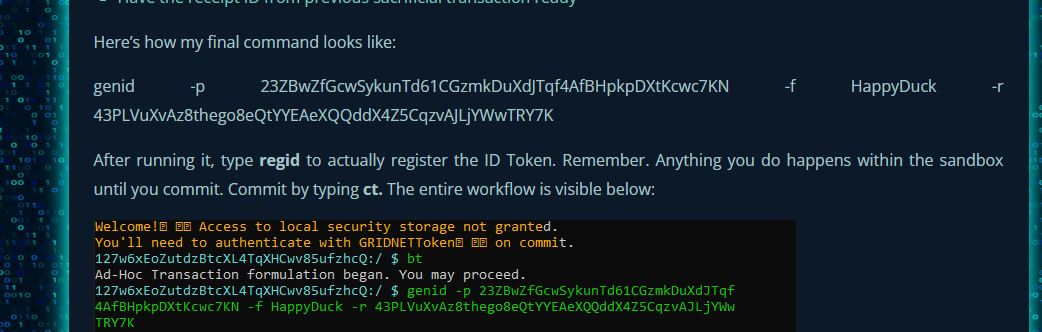
1MmshiakvDJWJ5GMGSavzR9SYDXCzLmoW2:/ $ bt
Ad-Hoc Transaction formulation began. You may proceed.
1MmshiakvDJWJ5GMGSavzR9SYDXCzLmoW2:/ $ vt
[Printing source-code]:
-------------------
0: cd
-> 1: '/1MmshiakvDJWJ5GMGSavzR9SYDXCzLmoW2/'
-------------------
Word Count: 1 Length: 41 Bytes
1MmshiakvDJWJ5GMGSavzR9SYDXCzLmoW2:/ $ sacrifice 1
✅ Sacrifice made!
Previous Balance: 15.20 GNC (15200000000000000776 Atto Units)
New Balance: 15.20 GNC (15200000000000000775 Atto Units)
1MmshiakvDJWJ5GMGSavzR9SYDXCzLmoW2:/ $ ct
Attempting to Commit the Transaciton..
Sacrificial Transaction of 1 GBUs has ✓valid semantics.
🙏Commencing further..
About to show the QR Intent. Resize ↕ the Terminal if needed.
---- SCAN the QR-code below with your GRIDNEToken ----
▄▄▄▄▄▄▄▄▄▄▄▄▄▄▄▄▄▄▄▄▄▄▄▄▄▄▄▄▄▄▄▄▄▄▄▄▄▄▄▄▄▄▄▄▄▄▄▄▄▄▄
█ ▄▄▄▄▄ █▀ ▄███▄ ▀▀▄▄▄ ▄▄ █▀ ▄ ▀ ███▀▀ █ ▄▄▄▄▄ █
█ █ █ █▄█ ▄█ ▄▄▀▄▄ ▀ █████▄ ▄█▀ ▄▄██ ▄█ █ █ █
█ █▄▄▄█ █ █▀▄▄█▀▀██▄▀ █ ▄▄▄ ▀▄▀ █ ▄█▀▀ ▀███ █▄▄▄█ █
█▄▄▄▄▄▄▄█ ▀▄█▄▀ █▄█▄█▄▀ █▄█ ▀ ▀▄█ █ █ █ █▄█▄▄▄▄▄▄▄█
█▄▄█ ▀▀▄▄▀ ▀▄▀█▀█▄▀▄▄█▀▄ ▄ ▄▄▄▄█▄█▄▄█ █▄███▄ ▀▄▄▀█
█▀▀█▄▀▀▄▄▀ ▄█ █ ▄ ▄▄ ▀▄█▄██▀██▀█▄▀▄███▄▀▀▀▀██▄█▄█ █
█▄██ ▄▀▄█▄█ ▄▀ █ ▄ ▀ ▄ █▄ ▄ ▄█▀▄ ▄█ █▄█ ▀█▀▀█
█▀ █ ██▄▄▄ █ █▄▄ ▀▀ ▄ █▀▄██ ▀█ ▀▀▄▀▄ ▄█▀█ █▀▄▀▄█
█▄▀ ▀▄▄▄ ██▀▄█▄█▄▄ █▀ ▄▄▄ ▀▄█ ▄▀▄▄█▄ █ ▄▄ ▄█▄▄▄█▄█
██▀▄ ▀█▄█ ▀ ▀██▀▀█▄█ █▄▀█ █▄▀▀█▀▀ ▄█▀▀▄▀▀██▀▄▄▀ ▄█
██▀▀ ▄▀▄▄▀▄ ▄ ▀███▄█▄ ██ █▄ ▄█▄▀▀██ ▄▄██▄▄█▄█ ▄██
██▄▄█ ▄▄▄ ██▄▀▀▄█▄▄ ▀▄ ▄▄▄ ▀ ▄ ▀▄████ ██ ▄▄▄ ██ ▄█
██▀▄ █▄█ ▄▄▀ ▄█ ▄ ▀▄█ █▄█ ▄ ▀▄▄ █ ▀██ █▄█ ▀ █
█▄ ▀█▄▄▄▄ ██▄█ ██▄▀ █ ▄▄▄█▀▀█▄▀███▀▄▀▄▄ ▄▄█▄▀▄█
█▀██▀ ▀▄▄▀█ █▄▄▄█▄ ▀▀ ▀ ▄▄ ▀ ▄▀▄█▄▄▄█▀█ █▀█ █▄███
█▀ ▄▀▀▀▄██▄▄ ▄██▀█▀▀▄▄██ █ ███▄ ▀▀ ▄▄█▀▄▄▄▀██ █ ↕ WINDOW IF NEEDED
█ █▄ ▀▀▄ ▀██▄█ ▀█▄█▄██▀ ▀█▀▄▄ ▀█▀▀███ █▄██▄ ▄ ▄▄█
█ █▄██ ▄▀ █▄ ▄▀▄▀▀ ▄▀ ▀██▄ █▄▀▄▄█▄ █▀▀ ▄▀▄▄ ▄█
█▀ ▀ ▄ █ ▄█ █▄█▀█ ▄▀████▄▄▄█▄ █ ▄▄ █████ █ ▀█ █
██ ▀▀█▄▄█ ▀█▄▀▄█▄█ ██▀█▄▀▄▀▄ ▀▄▀▄▄▀ █▀▀ █ ▄▀▄▄▄▄█
█▄▄▄███▄▄▀██ ▄▀▄▄█▀ ▄ ▄ ▄▄▄ ██▀▄▀ ▀▄ █ ▀ ▄▄▄ ██
█ ▄▄▄▄▄ █▄▀█ █▄▀ ▄ ▀▄ █▄█ █▄ ▀▀ ▀ ▀▀██ █▄█ █▀ ▄█
█ █ █ █▀ ▀▀▄ ▄██▀ ██▄ ▄▄ ▄▄▀█▄██ ▄▄█ ▄▄▄▀█▄ █
█ █▄▄▄█ █▀█ ▄▄█ ▄▄█ ▄ ▀▄ █ █▀▀▄ █▄██ ▄█ ▀ █▀ ▄████
█▄▄▄▄▄▄▄█▄███▄▄▄▄█▄▄▄██▄█▄███▄█▄▄▄▄█▄▄▄█▄▄██████▄▄█
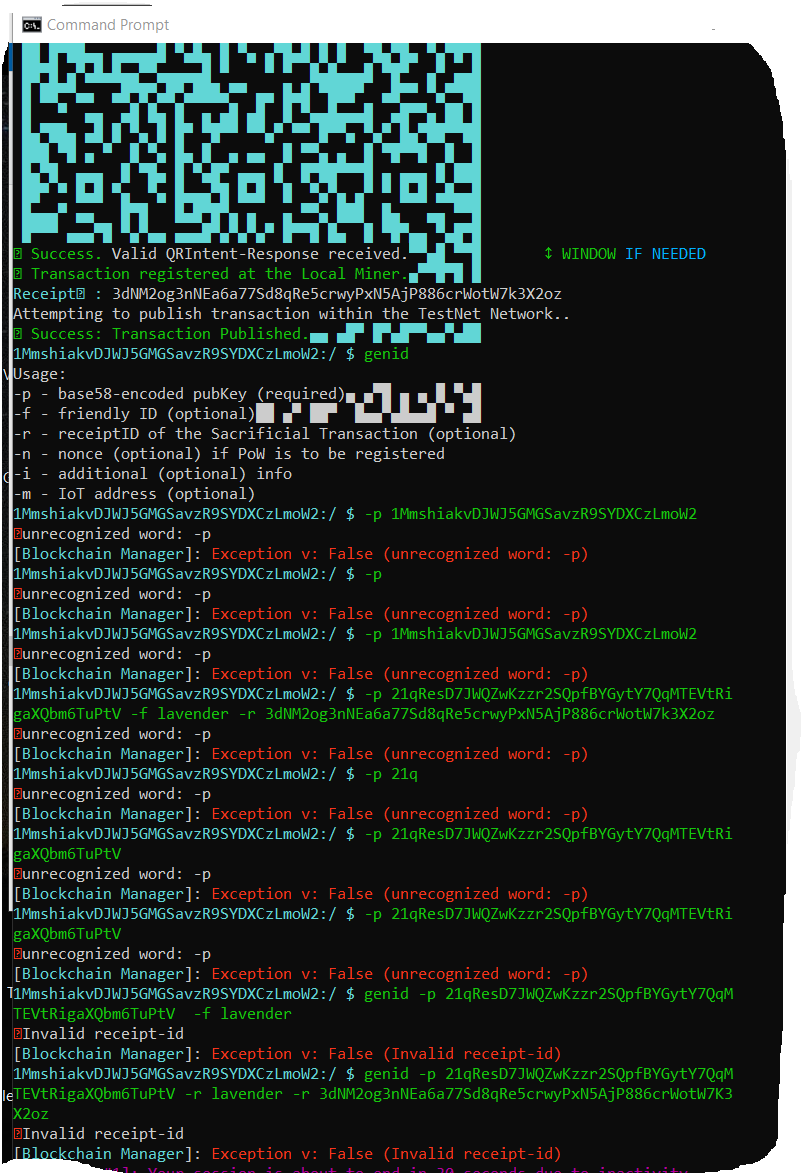
✅ Success. Valid QRIntent-Response received.
✅ Transaction registered at the Local Miner.
Receipt🔖: 3L3aCHSwA2AkfcpKAyQshgKvr1k9GhuLonYeXdXKa73WBipgot
Attempting to publish transaction within the TestNet Network..
✅ Success: Transaction Published.
[⚠WARNING #1]: Your session is about to end in 30 seconds due to inactivity..
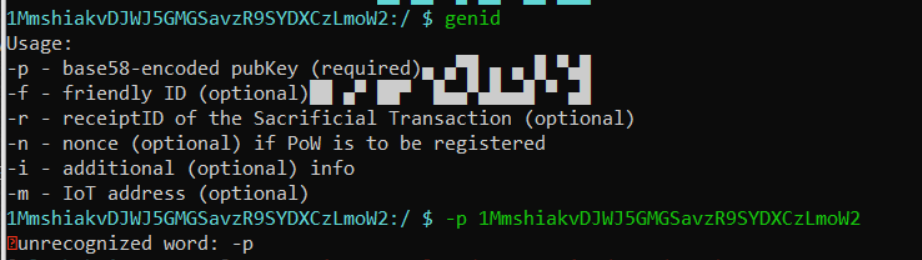
1MmshiakvDJWJ5GMGSavzR9SYDXCzLmoW2:/ $ genid
Usage:
-p - base58-encoded pubKey (required)
-f - friendly ID (optional)
-r - receiptID of the Sacrificial Transaction (optional)
-n - nonce (optional) if PoW is to be registered
-i - additional (optional) info
-m - IoT address (optional)
1MmshiakvDJWJ5GMGSavzR9SYDXCzLmoW2:/ $ genid -p 21qResD7JWQZwKzzr2SQpfBYGytY7QqM
TEVtRigaXQbm6TuPtV -f lavender -r 3L3aCHSwA2AkfcpKAyQshgKvr1k9GhuLonYeXdXKa73WBi
pgot
Base58-Encoded ID-Token put onto the stack. Type 'regID' to register
1MmshiakvDJWJ5GMGSavzR9SYDXCzLmoW2:/ $ regid
✅ Successfully registered an ID Token for 8J1QYGQgo8PXqQBf7XfjFSW8EkbZhnv31Q8U
FNpUDd1Fq54WHjvq
1MmshiakvDJWJ5GMGSavzR9SYDXCzLmoW2:/ $ ct
Attempting to Commit the Transaciton..
❎There's no code to commit in nested VMs.
[Blockchain Manager]: Exception v: False (There's no code to commit in nested VM
s.)
Dear @jamie I so much appreciate your will and stubbornness of not having given up.
Let me say, that as I had proposed in our previous encounter, it is always good to check whether the transaction was not only ‘published’ but also whether it was ‘processed’ and if so - to check for the ‘processing result’ .
Like I had advised previously, one may use the getresult GridScript command/utility for the very that.
I took the receipt identifier from the log which you’ve been so kind to provide.
Let us see:
$ getresult 3L3aCHSwA2AkfcpKAyQshgKvr1k9GhuLonYeXdXKa73WBipgot
Receipt 🔖 retrieved: 3L3aCHSwA2AkfcpKAyQshgKvr1k9GhuLonYeXdXKa73WBipgot
Transaction result : ✅ Valid Transaction
Wonderful, congratulations Operator!
Seems like your Sacrificial Transaction was successfully processed.
This means - it was not only processed by the full-node to which you were connected to over SSH, but the full-node compiled the code, and broadcasted the resulting (signed by you) code bundle (compiled bytecode) to other nodes and thus the instructions which you have executed during a SSH session affected the entire Network. Congratulations !
Sacrificial transactions serve as a kind of a Proof of Stake.
Your money is never truly lost.
It always serves a purpose , still that shall not be the topic here, as we have a task at hand which is to aid you - a highly respected Operator, with the trouble you are having at hand, and to do so at once
So the question is, - why did the latter parts fail?
The answer is - Operator, as had been explained to you previously, at least so I do recall, after you’ve committed the first Transaction, you need to initiate a new Begin Transaction (BT) ↔ Commit Transaction (CT) sequence if you will the results of your further actions to still be affecting the entire decentralized state machine. That is of in utmost importance.
Otherwise, no ‘broadcastable’ code would be being generated, as you interact with the system, and thus your actions would only be able to affect the ephemeral Sandbox,- one spawned for your SSH session only. As yet again, no broadcastable byte-code is being formulated.
After each commit the transaction formulation state - it terminates. It is assumed to be Completed. You need a new one.
So, when do you need to begin a new Begin Transaction (BT) ↔ Commit Transaction (CT) sequence ?
The answer is - right after the the node said:
✅ Success: Transaction Published.
Notice: you might always want to wait and check for the result of processing (getresult, remember?  ), before proceeding with a new one. Also, before initiating a new
 BT command, it would be also good to use the sync command to ensure that the state of your ⋮⋮⋮Terminal is synchronized with the current state of the ⋮⋮⋮ Decentralized State Machine! Why? Some other events might have taken place, Operator you might not the only person, issuing actions concerning your State Domain and it is always good to ensure you see it’s current state.
Yet again, if you do not begin a new transaction, no code would be being generated under the hood, and so there would be nothing to Commit, through the Commit Transaction (CT) command! The one which you have tried to execute for a second time by the end of your log. Such an operation is indeed doomed to fail, just as the node you are connected to reports:
❎There's no code to commit in nested VMs.
@jamie would you be so kind to point me to the tutorial you’ve been following? I’ll tripple check if the process was described right.
Yet again, thank you @jamie for you work, let us keep striding further - towards the Glory of Freedom and Decentralization!